Showing posts with label blog hacking. Show all posts

Tuesday, September 28, 2010

Already a few days I share tutorials and cheat for the game point blank that may now much sought after by the gamers and cheaters. I actually was not a loyal gamers but I just wanted to share it. but on this occasion I'd love to share more articles tutorials for blogging.

Them know with your social networking site Twitter? is surely, even you often use to communicate with friends, relatives, family and parents as well or boyfriend.

A blogging usually set up an account at social networking site Twitter was just to find a lot of traffic or visitors, why like? because right now most people gathered in networking sites like Facebook, google buzz, Yahoo Koprol, Twitter and many other such networking sites.

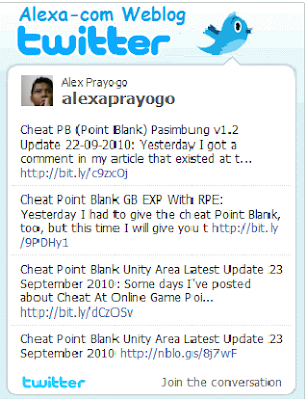
Blogging usually requires widgets or gadgets to enhance the appearance of their blogs. but on this occasion only change the look of twitter widget for bloggers who semulanya backgroundnya standard but which I share to you is more interesting and more neat and more comfortable in seeing.

Twitter

I do not want to elaborate on this occasion because there was no spare time for me. ie note the steps below:

Open your blog or to login at blogger.com
Select a blog that will be displayed on twitter widget
If you've signed in you click on add gadgets
Then you select the HTML / JavaScript
Then you enter scritp Destroy this widget I've become more good and interesting.

<div style='background:url(https://blogger.googleusercontent.com/img/b/R29vZ2xl/AVvXsEg-vTryNKWHdXHfjDfqTaguahCf-7ozL7-O6_n2g-uk7Z5xLWudR38pWml4KTpqHe649UbBgvQ36MWRvK8O-EDDUCv0ThcN_sZ46AdPJUGP0-WgvYgnSG72WjNWBnFMZ2WkESvpMYtGPM-Y/s1600/tweetbox.gif) no-repeat; padding-top:65px;padding-left:12px;'>
<script src="http://widgets.twimg.com/j/2/widget.js"></script>
<script>
new TWTR.Widget({
version: 2,
type: 'profile',
rpp: 10,
interval: 3000,
width: 275,
height: 255,
theme: {
shell: {
background: '#transparent',
color: '#555555'
},
tweets: {
background: '#transparent',
color: '#222222',
links: '#3b5998'
}
},
features: {
scrollbar: false,
loop: true,
live: true,
hashtags: false,
timestamp: false,
avatars: false,
behavior: 'default'
}
}).render().setUser('alexaprayogo').start();
</script>
</div>

If you've entered do not forget at the store and see the results of friends.

Note:

To change the display to your liking you can change through this red link (https://blogger.googleusercontent.com/img/b/R29vZ2xl/AVvXsEg-vTryNKWHdXHfjDfqTaguahCf-7ozL7-O6_n2g-uk7Z5xLWudR38pWml4KTpqHe649UbBgvQ36MWRvK8O-EDDUCv0ThcN_sZ46AdPJUGP0-WgvYgnSG72WjNWBnFMZ2WkESvpMYtGPM-Y/s1600/tweetbox.gif)
To change your post let me get into twitter widget you can change the nickname that like this (alexaprayogo)

Wednesday, August 18, 2010

In this opportunity I am eager to provide an article or widgets are crucial blogspot maybe once in the blogging world to improve your blog SEO. for the blogging mania may have been using this widget is Recent Post but at this widget widgets exist in its addition of the pictures, even in the menu widget exists as in post there yait Date, More, just like that.


And I took this widget from a blog that has been popular by those who first started blogging. these widgets you can modify your own important to understand the HMTL and CSS.

I do not want a long conversation with this article because it is still much work to me finish. you want to use these widgets see below :

  • First you copy the code below, in blue :


<script style="text/javascript" src="http://bloggerplugins.org/scripts/recentpostswiththumbs.js"></script>
<script style="text/javascript">
var numposts = 10;
var showpostthumbnails = false;
var displaymore = false;
var displayseparator = false;
var showcommentnum = false;
var showpostdate = false;
var showpostsummary = true;
var numchars = 200;
</script>
<script src="/feeds/posts/default?orderby=published&alt=json-in-script&callback=showrecentpostswiththumbs"></script>

  • Then you must first go to the Design and Page Element.
  • Then you click add gadgets.
  • After that you select HTML / JavaScript.
  • If It's Going to the choice of HTML / JavaScript that you please enter the code blue and you had already copied earlier.
  • then do not forget you save.
  • After that you can see the results of these widgets.
Note to you:

If you want to use the note below:

if you want to display the latest articles as much as 5 or 20 articles please replace the code that is also red, below.
var numposts = 10;
 
if you want your latest article has a picture please you replace with True red.
var showpostthumbnails = false;


if you want to show other features that you please replace that code with the code of the True Red color. 

var showpostthumbnails = false;
var displaymore = false;
var displayseparator = false;
var showcommentnum = false;
var showpostdate = false;


if you wanted to modify all the recent post you need JavaScript please can you look at the URL below.


http://bloggerplugins.org/scripts/recentpostswiththumbs.js

    Sunday, November 15, 2009

    In this post, we will discuss some easy ways to add or place Adsense ads. Post this may have been a lot of people who know the tips and tricks that way but I want to post tips and tricks time to share knowledge and tips and tricks I have been using this time. Such knowledge I have been approved by the mas doyok you all might have known him. I thank mas doyok who has given me insight into a very high about the science of all this blogging.

    at the end or in early post Anda.ini one way that can be used to increase "click" AdSense ads on your blog. To put the unit code of the Adsense ads that you first have to take the code in the Adsense account, in making sure you have registered
    Once you get the code and want to put on your blog, the following steps:

    1. Open the Layout tab on your Blogger Page Element
    2. Click Edit HTML
    3. Do not forget to check the Expand Widgets tempelates
    4. Then find the following code:
    <data:post.body/>
    5. When you've met, Then Put Adsense code before and after the code above
    But before you enter the code - the code on your adsense code to the first prase because the code - the code from adsense using java script normally or using animation and much more. Please go http://centricle.com/tools/html-entities/. Enter your HTML code earlier. Click Encode. Then the code will automatically change

    Example:

    <>


    <>


    6. Preview final result, if the match immediately press the Save button


    Note: Not recommended for use in this way, usually Adsense does not like in ways like this, so be careful. Can - can google Adsense account or the other can be banned because it can hurt and how this is a very unfair way, and probably not good for me.
    Hopefully these tips and tricks can be useful for you all, for trying good luck.

    Sunday, November 8, 2009


    In this post is just posting random tips and tricks and this from a master of doyok mas. That I will issue a tip and trick how to make a 3 column under the header which I've tried and can walk well on my blog this very simple and just getting destroyed, ! want to know how a simple but useful, follow these steps - these steps:
    Enter the code - the HTML code below on this code ]]></b:skin>  :


    #kolom {

                width: 960px;

                position: relative;

                clear: both;

                margin: 0px 0 15px -10px;

                color: #000000;

                float: left;

                padding: 0 0;

                background: #cccccc;


                border-bottom: 2px solid #e6e6e6; }


    #kolomkiri {

                width: 290px;

                float: left;

                margin: 0 5px 0 10px;

                padding: 5px 15px 5px 10px;

                border-right: 1px solid #e6e6e6;

                }


    #kolomtengah {

                width: 290px;

                float: left;

                margin: 0 5px 0;

                padding: 5px 15px 5px 5px;

                border-right: 1px solid #e6e6e6;

                }


    #kolomkanan {

                width: 290px;

                float: left;

                margin: 0 0 0 5px;

                padding: 5px;

                }


    .kolom li {

                background:url('https://blogger.googleusercontent.com/img/b/R29vZ2xl/AVvXsEjdBZ08pIhyphenhyphensUVt-4RXLpMq2SFyr8eswLMsRO6MtU-tj7vELAUSMWp3ZYvraxnf15b6O3xNoE61pfU53bWrGKIHwPVXSUAP2mxoosh5wv9V090hT_i9UOmnk_rXlNjKUHtYOydk4yd1gEE/s1600/arrow_icon.png') no-repeat;

                list-style-type: none;

                margin: 0 0 5px;

                padding-left: 20px; }


    .kolom ul {

                list-style-type: none;

                margin: 0;

                padding: 0; }


                .column ul li {

                            background:url('https://blogger.googleusercontent.com/img/b/R29vZ2xl/AVvXsEjdBZ08pIhyphenhyphensUVt-4RXLpMq2SFyr8eswLMsRO6MtU-tj7vELAUSMWp3ZYvraxnf15b6O3xNoE61pfU53bWrGKIHwPVXSUAP2mxoosh5wv9V090hT_i9UOmnk_rXlNjKUHtYOydk4yd1gEE/s1600/arrow_icon.png') no-repeat;

                            list-style-type: none;

                            margin: 0 0 5px;

                            padding: 0 0 0 20px;

                            border-bottom: 1px dashed #e6e6e6; }


    .kolom h2 {

                background: #cccccc;

                color: #000000;

                height: 29px;

                text-transform: uppercase;

                margin: 0 0 10px;

                padding: 6px 0 3px 0px;

                font: bold 18px Arial, Tahoma, Verdana;

                text-align: center; }

    then you find the following code <div id='main-wrapper'>


    when it met with the code enter the code - the code below the above code


    <div id='kolom'>

    <b:section class='kolom' id='kolomkiri' preferred='yes' showaddelement='yes'/>

    <b:section class='kolom' id='kolomtengah' preferred='yes' showaddelement='yes'/>

    <b:section class='kolom' id='kolomkanan' preferred='yes' showaddelement='yes'/>

    </div>


    When you finish do not forget to save templates

    Tuesday, November 3, 2009


    Tag Technorati: {grup-tag},,
    Rock when I do surf and a lot of people consulting with me. I told them to send email to me, but after I answered and no answer to any of their consultation. I think again if they are able to own or already get from other people, I do not know it all because I did not have time to do research on them because I am busy with school and my job is to cover all my spare time at home. And I do blogging every day or every week when I was only just refreshing. This time I took time to make sure the post for beginners blogging for beginners blogs a lot to ask about how to change the text or OLDERPAGE HOME or the like that we are home to a small icon in order that we can Professional blog, like yesterday's post about 17 tips and tricks blog professional, including entry in here. We just came into our topic of making a small icon to the writing and the other Home, follow these steps - steps as follows:

    The first course was conducted at blogger.com and login to edit the HTML layout and select the expand widget template.
    Next find the code like below:
    But I suggest to simplify the code search - a lot of code that you may not find 1 / 1, you click the CTRL + F and enter the code you will search in the box that was provided to conduct these searches


    <span id='blog-pager-newer-link'>
    <a class='blog-pager-newer-link' expr:href='data:newerPageUrl' expr:id='data:widget.instanceId + "_blog-pager-newer-link"' expr:title='data:newerPageTitle'><data:newerPageTitle/></a>
    </span>
    </b:if>
    <b:if cond='data:olderPageUrl'>
    <span id='blog-pager-older-link'>
    <a class='blog-pager-older-link' expr:href='data:olderPageUrl' expr:id='data:widget.instanceId + "_blog-pager-older-link"' expr:title='data:olderPageTitle'><data:olderPageTitle/></a>
    </span>
    </b:if>
    <b:if cond='data:blog.homepageUrl != data:blog.url'>
    <a class='home-link' expr:href='data:blog.homepageUrl'><data:homeMsg/></a>
    <b:else/>


    When you've found the code above instead of the red color icon that you have provided:
    � Data: newerPageTitle = new post
    � data: the Old Post olderPageTitle =
    � Data: homeMsg = Home (front page)
    was code for the following image link:


    \x3cimg src='http://URL image you'/\x3e
    \x3cb:else/\x3e

    but when you're done changing the icon you want to be sure to save the template. Then see the results of the earlier edits.
    If the above script in the other join would be a case of this

    <a class='blog-pager-newer-link' expr:href='data:newerPageUrl' expr:id='data:widget.instanceId + "_blog-pager-newer-link"' expr:title='data:newerPageTitle'> <img src='http://Url ICON anda'/></a>
    </span>

    Good luck hopefully s tips and tricks can be very useful for the beginner to the master of my blogging this post out because many people are asking about this. Enough of this post may be useful to the blogging.

    Saturday, October 24, 2009

    in this post I want to answer a question from my friends who like blogging and others. there is this friend of mine who unfortunately HS residing in bandung, he said how, create way these google translate? My answer is very easy. This step - step mas ... is as follows:
    1. you to login to blogger.com
    2. then you go straight to the layout
    3. add widgets
    4. then you select the HTML / Java script
    5. then you enter the code - code that is below dah..

    <div id="google_translate_element"></div><script>
    function googleTranslateElementInit() {
      new google.translate.TranslateElement({
        pageLanguage: 'en'
      }, 'google_translate_element');
    }
    </script><script src="
    http://translate.google.com/translate_a/element.js?cb=googleTranslateElementInit"></script>

    Do not forget to save the widget translate

    Thursday, October 22, 2009

    how do I change the name of the link "post a comment" to discuss Indonesia or English, for a very simple example for you "give your comment", "your comments", and many examples. we come to the point we are about how to change the name of the link to post a comment. for steps - steps as follows:


    1. Go to your Blogger layout tab, then click Edit HTML 
    2. Check the Expand Widget Tempelates  
    3. Next you find the following code in the Edit Template


    <p class='comment-footer'> 


    <a expr:href='data:post.addCommentUrl' 
    expr:onclick='data:post.addCommentOnclick'> your comments </a> 
    </p>


    you can comment you replace your liking.
    4. When finished, do not forget the Save

    Wednesday, October 14, 2009


    in this post I just repost a post that has a lot of in posting by many blogs in the world or the webmaster who spread on the Internet or cyberspace. but I just add it on the first post related to a new post related to an image that is as follows:

    1. First, go first to the Edit HTML, do not forget to check the "Expand Widget Templates"
    2. Look for this code \x3c/ head\x3e
    3. Then replace the code below

    \x3c! - Related Posts with thumbnails Scripts and Styles Start -\x3e
    \x3cb:if cond='data:blog.pageType == "item"'\x3e
    \x3cstyle type="text/css"\x3e
    # related-posts (
    float: center;
    text-transform: none;
    height: 100%;
    min-height: 100%;
    padding-top: 5px;
    padding-left: 5px;
    )

    # related-posts h2 (
    font-size: 1.6em;
    font-weight: bold;
    color: black;
    font-family: Georgia, "Times New Roman", Times, serif;
    margin-bottom: 0.75em;
    margin-top: 0em;
    padding-top: 0em;
    )
    # related-posts a (
    color: black;
    )
    # related-posts a: hover (
    color: black;
    )

    # related-posts a: hover (
    background-color: # d4eaf2;
    )
    \x3c/ style\x3e
    src='
    http://blogergadgets.googlecode.com/files/relatedthumbs21.js' \x3cscript type='text/javascript'/\x3e
    \x3c/ b: if\x3e
    \x3c! - Related Posts with thumbnails Scripts and Styles End -\x3e
    \x3c/ head\x3e


    4. Now looking back the code below
    \x3cdiv class='post-footer-line post-footer-line-1'\x3e
    If you do not find the code above, try searching the code like this
    \x3cp class='post-footer-line post-footer-line-1'\x3e
    if is met, live input all the code below under one of the above code that associates found.
    \x3c! - Related Posts with Thumbnails Code Start -\x3e
    \x3cb:if cond='data:blog.pageType == "item"'\x3e
    \x3cdiv id='related-posts'\x3e
    values='data:post.labels' \x3cb:loop var='label'\x3e
    cond='data:label.isLast \x3cb:if != "true"'\x3e
    \x3c/ b: if\x3e
    \x3cb:if cond='data:blog.pageType == "item"'\x3e
    \x3cscript expr: src = ' "/ feeds/posts/default/- /" + data: label.name + "? alt = json-in-script \x26 callback = related_results_labels_thumbs \x26 max-results = 6"' type = 'text / javascript'/\x3e\x3c/ b: if\x3e \x3c/ b: loop\x3e \x3ca href ='
    http://www.bloggerplugins.org/2009/08/related-posts-thumbnails-blogger-widget.html 'style =' display: none; '\x3e Related Posts with thumbnails for bloggers \x3c/ a\x3e \x3ca href='http://www.bloggerplugins.org/' style='display:none;'\x3e blogger widgets \x3c/ a \x3e
    \x3cscript type='text/javascript'\x3e
    var currentposturl = "\x3cdata:post.url/\x3e";
    var maxresults = 5;
    var relatedpoststitle = "Related Posts";
    removeRelatedDuplicates_thumbs ();
    printRelatedLabels_thumbs ();
    \x3c/ script\x3e
    \x3c/ div\x3e \x3cdiv style='clear:both'/\x3e
    \x3c/ b: if\x3e
    \x3c! - Related Posts with Thumbnails Code End -\x3e

    5. Do not forget to see the results stored dah
    To show how many posts related to editing the code below:
    var maxresults = 5;
    To change the title, you can edit this code: 
    var relatedpoststitle = "Related Posts";
    I hope you succeed .... good luck for your blog and do not forget to comment for this post.

    Tuesday, October 13, 2009

    Tag Technorati: {grup-tag}
    in this post I will talk about blogs in banned by google. a lot of my friends who complained to the state of blogs or websites that have been built in banned by google. and your blog or website has been banned by google the page rank your blog or website will decrease drastically and can not be lookups by google update again and also lost a lot of things that cause your blog or website we become silent by visitors, but here I will give tips and tricks for your blog or website so that you are not in the currently banned by google. examples of blogs or websites of my friends who have been banned by google is mas doyok, saridara, and others.

    and this is the tips and tricks that I had made to avoid banned blog or website, is as follows:

    1. content (doubles)
    If you have the same content in a page within your website or maybe the same content on different sites, Google will "punish" your site with a lower rank or sometimes even make your site banned.
    If you feel some content to copy your website (you can find the page / pages that duplicate using the same phrase with the words you use when looking for your original content), you can give warning to the
    webmaster of the site that you copy paste content or go to www. google.com / dmca.html.
    2.Cloaking and Redirects
    Cloaking is a non-ethical techniques to create Web pages that "different" to search engines and visitors. So,
    webmaster create a Web page that does not mean that and fill it with the most searched keywords. As visitors enter this website, they will automatically be transferred (redirect) to a good page and good quality, but the spider (robot) from a search engine does not "see" the good web pages and quality, he will "see" into the web page does not mean this. Currently, search engines have opposed this cloaking technique. However, this technique is still a lot happening right now because the search engine is still difficult to find and penalize sites that use this technique. Although search engines are less effective in detecting cloaking, does not mean that such sites would never be detected. So, do not use cloaking and redirect to your site are not banned by search engines.
    3.Teks and Hidden Links
    The text and hidden links are not visible to visitors but will be seen by search engines. Generally, text and hidden links have the same color with the background color (background) from Web pages. This trick is often used to augment the
    webmaster web pages with keywords and links do not appear to increase the page rank. Currently, search engines have been able to identify the hidden text and links with both and consider them as Spam. Sites that use this trick, of course, will be banned.
    Keyword Spam 4.working
    Keyword spam is to give too many keywords in the META tags and body text. Commonly used way is by repeating the same words and give a lot of keywords that are not related to the content. If search engines detect this, of course, your site is in the balance.
    Towards 5.Link site "Wicked"
    Backlink is good to improve your site ranking, but be careful when joining a link farm is designed to "inflate" artificially link popularity.
    - Do not sell or buy links to improve rankings artificially / false.
    - Do not link to the Web that uses Spam techniques to increase rankings.
    - Do not join link exchanges designed to improve the ranking.
    - Do not link to sites that have been banned by
    Google.
    6.Machine-Generated Web Sites
    This site is the site to generate / create automatically hundreds of the same Web page. In general, highly effective search engine to detect such sites, but these sites are banned for having reported first by the site's users.

    Conclusion

    Most search engines, including Google - of course, consider illegal techniques above. If you are detected using these techniques, which will probably happen is:
    - Your web page will be Flagged red or marked for further inspection by a human (manual).
    - Your web page will be deployed to its page rank. \x3c- if is this not possible because of this blog PR0 .
    - Your web page will be removed from the search engines.
    - The entire site will be banned by search engines.

    Monday, October 12, 2009

    course to all of you already know about the live window of the window so we should not be afraid to windows live, and many people are using the window but the window live live out the latest products for blogging is very easy and does not require an internet connection to post or edit blog however, you simply open the program or the application window is the latest live this writer. and you can be offline blogging while working on problems, or drink coffee or can also listen to music from slank or emerald .


    if you all new blogging world, for the purpose of posting an article or editing your blog does not have to login to blogger dashboard and working in posts that have been provided by the blogger. if I like that already antiquity and no longer used by the expert or experts blogging because it's no time to login to blogger but now so many tools or software for free, or the latest spread on the Internet that can be to post the article in without having to entered first blogger dashboard. call Wbloggar tool, Scribefire, Post2Blog, and the latest from the window Windows Live Writer I have discussed in this post. you still do not understand well the offline blogging? in short, you simply make an article on offline blogging tool you use, then you can click on the button and automatically publish articles that you created earlier will be immediately posted on your blog.
    of the many offline blogging tool that I tried the reliability of these tools, it turns out I also fell in love with these corporations microsoft products. considerations - the reasons why I choose windows live writer as a partner in blogging about doing good and reliable are as follows:
    1. be offline blogging. means that I can do a post with the way offline and when I write a post for my blog, I do not not have to go first into the dashboard of blogger, so are not required to connect to the  or offline network Internet first. for that we can save or cost allowance and severe internet if you use the Internet yourself at home, you can save your Internet quarto.
    2. look very interesting. when I saw the first time with the right tools like window.
    3. editor tool which is very complete. if you are already familiar with using blogger editor, so when you use these tools, you'll be dreamy in places, because the atmosphere is all-new and complete, and may in said also was using microsoft word famous.
    4. a powerful image editor. Blog Windows Live Writer of this latest image editors have a tool that is very reliable at all, only with a single click will cause the effect of a very interesting picture. 
    5. not have to upload the image. on WLW latest version, you do not need upload the first picture because it will be automatically uploaded to your Picasa Web Albums.
    6. Preview Multi Editor. You can choose your favorite editor, in HTML version or regular version (WYSUWYG), as well as a preview to see the web in real.
    7. Adding Plugin. Similarly, a very famous FireFox with Add-On feature it so firefox more reliable performance. WLW there any Add-Plugin facilities, various plugins for WLW adds reliability can be downloaded and you add at will.
    and still a lot of reliability of the latest version of WLW that this time. Do not doubt the reliability of current WLW. please download here! or here
    who want to add a plugin in WLW please visit this

    Tuesday, September 22, 2009

    Tag Technorati: {grup-tag}
    Post this time, I want to give you how to create animated menus that are on the right or left of your blog. Widget menu list one of the most interesting in my opinion, for example you can see my right-wing blogs have animated menus. You are interested ........??? The following steps - steps made.

    # Log in to Blogger with your ID.
    # Select the Layout then click Edit HTML.
    # Back up the template first, if fear of failure.
    # Look for this code: </ head> in your template.
    # Copy the entire code below, then paste it right above this
    code:
    <style>
    # menu1 a (color: white; background-color: # 3D81EE; text-decoration: none; text-indent: 1ex;)
    # menu1 a: active (color: white; text-decoration: none;)
    # menu1 a: hover (color: brown; background-color: # 0066CC)
    # menu1 a: visited (color: yellow; text-decoration: none;)
    </ style>
    <script language='JavaScript1.2' src='http://www.geocities.com/adestd40/mmenu.js'/>
    <script>
    resizereinit = true;
    menu [1] = (
    id: 'menu1',
    bartext: 'MENU BLOG',
    menupos: 'right',
    barbgcolor: "# FF0000",
    barcolor: "WHITE",
    barfontweight: "bold",
    barfontsize: '100% ',
    bordercolor: '# ffffff',
    fontsize: '100% ',
    linkheight: 20,
    hdingwidth: 210,
    menuItems: [
    [ "Home", "http://www.echabintangtimur.blogspot.com", "_self"],
    [ "Tutorial Blogger", "http://www.echabintangtimur.blogspot.com/search/label/Tutorial% 20Blogger", ""],
    [ "Software", "http://www.echabintangtimur.blogspot.com/search/label/Software", ""],
    [ "Anti Virus", "http://www.echabintangtimur.blogspot.com/search/label/Antivirus", ""],
    [ "Exchange Links", "http://www.echabintangtimur.blogspot.com/search/label/Tukar% 20Link", ""],
    [ "Banner Links Friends", "http://www.echabintangtimur.blogspot.com/search/label/Tukar% 20Link", ""],
    [ "The Color Code", "http://www.echabintangtimur.blogspot.com/2009/06/kode-warna-html.html", ""],
    [ "Blog Contest", "http://www.echabintangtimur.blogspot.com/search/label/Blog% 20Kontes", ""],
    [ "Motivation", "http://www.echabintangtimur.blogspot.com/search/label/Motivasi", ""],
    [ "Trick Tips", "http://www.echabintangtimur.blogspot.com/search/label/Tips% 20Trik", ""],
    [ "Award", "http://www.echabintangtimur.blogspot.com/search/label/AWARD", ""],
    [ "Contact Me", "http://kontactr.com/user/echabintangtimur", ""],
    [ "Back To Top", "#", ""] / / at the end of the entry should not be given a coma
    ]);
    make_menus ();
    </ script>

    # The data above is the data shown in the floating menu star.
    # Replace the red printed with the data you want to display and only as an example.
    # When finished click Save Template.
    # See the blog you now.
    # Good luck, hopefully useful ...!!!
    Widget Code menu located above the right wing of your blog, if you want to change it so the left wing, menu post replace this sentence: 'left', became menu post : 'right',
    Subscribe to RSS Feed Follow me on Twitter!